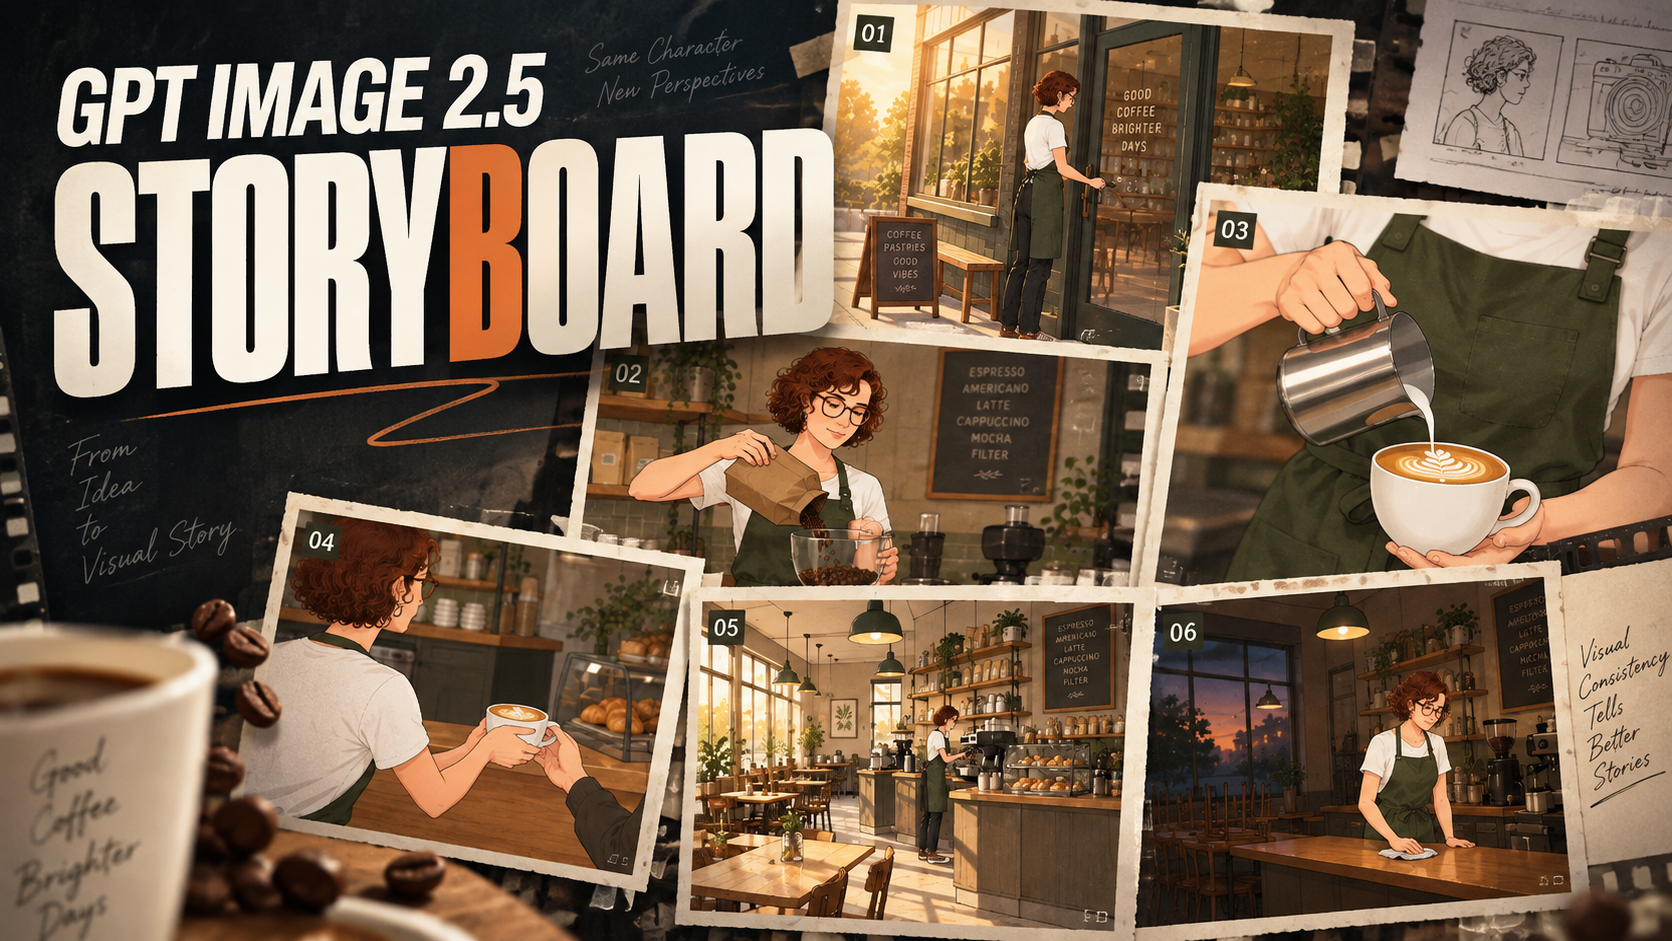
A GPT Image 2.5 storyboard turns a rough story idea into a sequence of planned shots before you spend time or credits generating video. Instead of asking a video model to invent every camera angle, pose, wardrobe detail and environment at once, you establish the cast, plan the shots, inspect continuity, and only then move approved frames into production.
I ran this workflow end to end and logged every number. The headline result is worth stating before anything else, because it contradicts what most people assume:
Working from the same character reference, generating all six panels as one sheet took 32.5 seconds and 1 credit. Generating the same six shots as separate frames took 3 minutes 13 seconds and 6 credits — and held continuity worse.
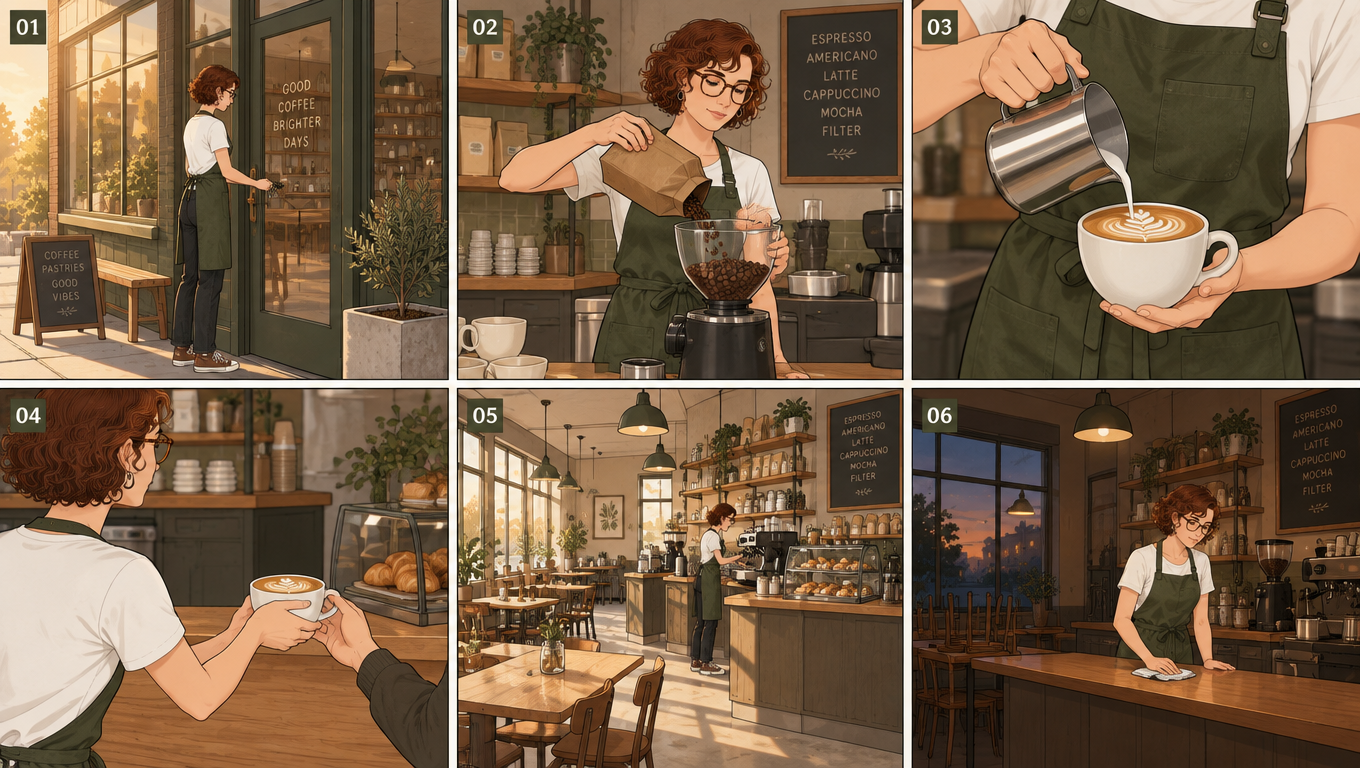
The separate-frame version produced sharper individual images. It also broke prop continuity between panels three and four, drifted on set dressing, and pulled the reference image’s grey backdrop into a close-up. The single sheet did none of those things. That trade-off — resolution versus continuity — is the central decision in any GPT Image 2.5 storyboard workflow, and the rest of this guide is built around it.
Everything below was generated on 15 September 2026 using GPT Image 2.5 Flare at 16:9, 1K resolution and Medium quality, from a single uploaded character reference, with one storyboard frame handed on to Seedance 2.5 for animation. Every timing and credit figure is measured, not estimated.
What Is a GPT Image 2.5 Storyboard?
A GPT Image 2.5 storyboard is a sequence of generated images used to plan how a story, advertisement, music video, short film or social clip unfolds visually.
A simple six-shot board might include an establishing wide shot, a medium shot introducing the subject, a close-up of an important detail, an action shot, a reaction shot, and a closing hero frame.
The images do not need to be final production frames. Their job is to answer questions before video generation:
Who is in the scene?
What does the character look like?
Where is the camera?
What changes from shot to shot?
What stays the same?
Where does the sequence end?
Instead of writing one enormous video prompt and hoping the model interprets every beat correctly, you break the idea into visual decisions first.
Why GPT Image 2.5 Fits Storyboard Workflows
Storyboard generation creates three hard problems at once: identity consistency, composition changes, and multi-image continuity.
OpenAI’s release notes for ChatGPT Images 2.5 highlight stronger reference-subject preservation, more precise editing that leaves surrounding detail alone, and better consistency across multiple editing turns. Those three claims describe exactly what a board needs — a board is a multi-turn edit problem wearing a different hat.
If you are coming from the previous generation, the change that matters most for boarding is reference fidelity; our GPT Image 2 page covers what the earlier model does and does not hold on to.
The mechanism that makes it practical is the reference image. In Edit image mode you can load up to 16 reference images (JPG, PNG or WebP, 10 MB each). One slot is enough for a whole board, and in my test the reference stayed loaded across every generation — the counter still read 1 / 16 after the last frame. You load the character once and then you are only writing shot descriptions.
Start With the Story, Not the Image Prompt
The easiest way to create a weak AI storyboard is to begin with visual adjectives — cinematic, dramatic lighting, ultra detailed. That produces an attractive frame. It does not produce a story.
Write the sequence in plain language first:
A barista opens her café at dawn, grinds the day’s beans, pours a latte, hands it to the first customer, works through the mid-morning rush, and closes up alone at dusk.
That gives you six natural beats. Then turn each beat into a shot with a framing decision attached. Now the model has a structure to follow rather than a mood to interpret.
Step 1: Create the Character Reference First
If a person appears throughout your GPT Image 2.5 storyboard, do not describe their appearance independently in every panel. Create one approved identity and treat it as the visual source of truth.
Character reference prompt:
Character reference sheet for a storyboard. A 30-year-old female barista named Mia: short curly auburn hair, round tortoiseshell glasses, olive-green apron over a white tee, small silver hoop earrings, brown canvas sneakers. Three full-body views side by side on a plain light-grey background: front view, three-quarter view, side profile. Even flat lighting, clean editorial illustration style, muted color palette, neutral standing pose, no text.
On Flare at 16:9, 1K and Medium quality this returned a 1360 × 768 PNG in about 25 seconds for 1 credit.
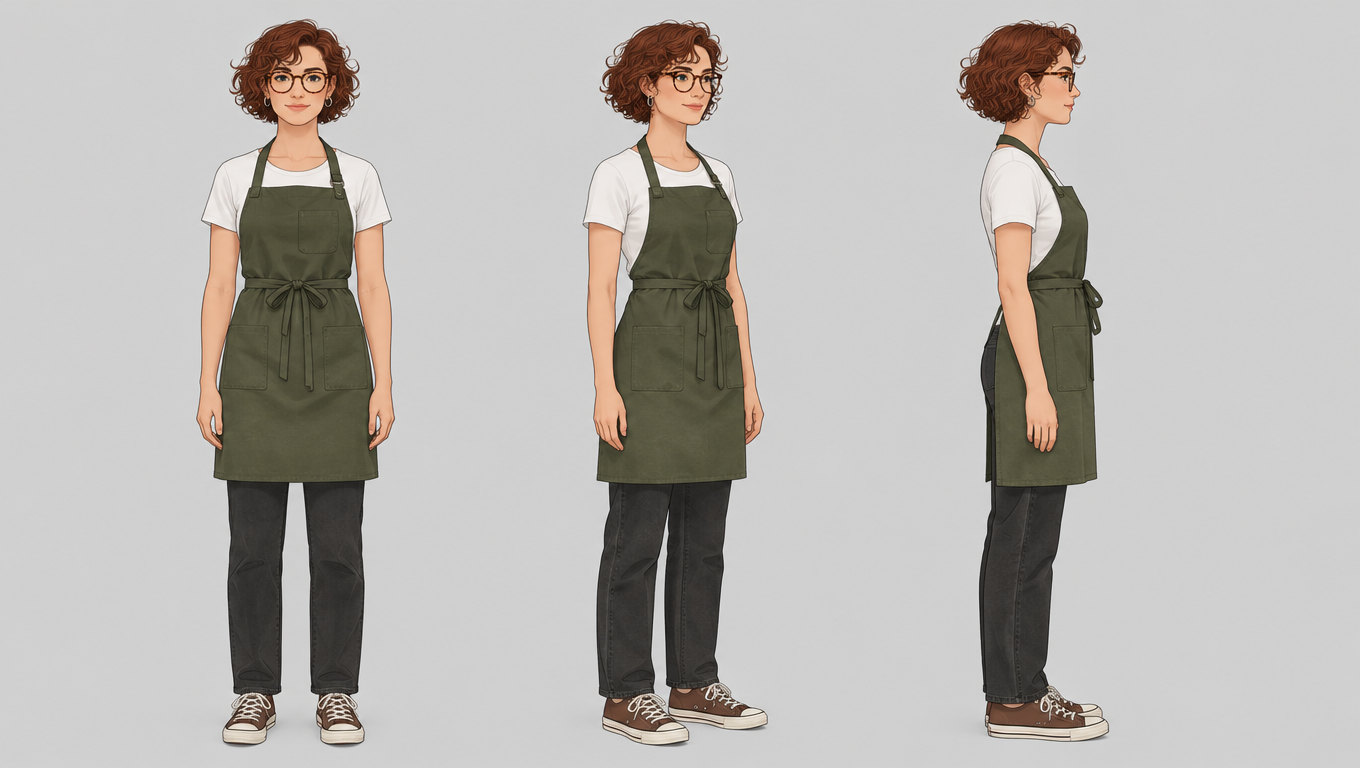
One detail matters more than it looks: I asked for brown canvas sneakers and got dark ones — and every subsequent panel faithfully reproduced the dark ones. Whatever the reference sheet gets wrong, your storyboard will reproduce six more times. Approve the sheet properly before building on it.
Identity stays fixed. Shots change.
Step 2: Define Your Continuity Lock
Before listing shots, write a short set of invariants:
Keep the exact same barista from the reference image across every panel. Preserve her facial structure, short curly auburn hair, round tortoiseshell glasses, olive-green apron, white tee and body proportions. Keep the same café location, colour palette and lighting logic throughout.
This block is the most load-bearing part of a GPT Image 2.5 storyboard prompt. It tells the model what is allowed to move and what is not. Without it, every panel becomes an independent interpretation.
Step 3: Give Every Panel One Job
A storyboard works because each frame contributes new information.
Shot | Purpose | Typical framing |
|---|---|---|
1 | Establish location | Wide shot |
2 | Introduce action | Medium shot |
3 | Build tension | Medium close-up |
4 | Show important detail | Close-up |
5 | Deliver turning point | Over-the-shoulder |
6 | End sequence | Hero wide or close-up |
If every panel is a waist-up portrait, the sequence may be visually consistent but narratively useless.
Copy-Ready 6-Panel GPT Image 2.5 Storyboard Prompt
This is the prompt I actually ran. It produced a clean 3 × 2 grid with correctly ordered 01–06 numbering in 32.5 seconds for 1 credit.
Create a cinematic six-panel storyboard arranged in a clean 3x2 grid. Use the uploaded character image as the permanent identity reference.
Continuity lock: keep the exact same woman’s face, hair, glasses, apron, top and body proportions across all six panels, and keep the same location, lighting and colour palette.
Panel 1: wide shot — [establishing action]. Panel 2: medium shot — [introduce the task]. Panel 3: close-up — [important detail]. Panel 4: over-the-shoulder shot — [exchange or turning point]. Panel 5: wide shot — [scene at its busiest]. Panel 6: wide shot — [closing beat].
Use clear panel borders and number the panels 01 to 06. [Style] illustration style, muted palette. Do not add extra characters, change the wardrobe, or alter the location.
Three things in that structure earn their place. Naming specific features beats saying “keep her consistent.” Restating the style clause stops the board drifting from illustration toward photography. And explicit panel numbering is what makes the sheet readable as a sequence rather than a mood board.
Worth noting for anyone who assumes AI image models cannot render text: in my run the panel numbers came out correct and in order, and the café signage rendered cleanly — a menu board reading ESPRESSO / AMERICANO / LATTE / CAPPUCCINO / MOCHA / FILTER, spelled correctly, plus legible window lettering. I did not compare this against an older model, but it is worth knowing that signage inside a board is not automatically a write-off.
One Storyboard Sheet or One Shot at a Time?
This is the most important workflow decision in the whole guide, and I have measured numbers for both sides.
Method 1 — Generate the whole board as one sheet
You write a single prompt describing every panel and get back one image containing all six or nine of them. Because all the panels are generated in the same pass, they share one visual context, which may help explain the stronger continuity observed in this test. The cost is resolution — a six-panel sheet at 1K leaves each panel roughly 450 × 380 px, which is fine on screen and useless as a production asset. This is the method for deciding whether your shot order works, for showing a client a sequence, and for anything you will iterate on more than twice.
Method 2 — Generate each shot separately
You load the character reference once, then write one prompt per frame, keeping the continuity block and changing only the shot description. Every frame comes back at full 1360 × 768, ready to hand to a video model or drop into a deck. The cost is that each frame is generated in isolation, so nothing carries between them except what your reference image and your prompt explicitly supply — which is exactly where the continuity failures documented later in this guide come from. This is the method for frames that have a job after the board is approved.
What each actually cost
Both methods start from the same character reference sheet, which cost about 25 seconds and 1 credit of its own. The first two rows below compare only the storyboard step, so the reference is excluded from both sides; the last row adds it back for anyone budgeting the complete job.
One sheet (6 panels) | Frame by frame (6 frames) | |
|---|---|---|
Generation time | 32.5 s | 3 min 13 s |
Credits | 1 | 6 |
Image size | 1360 × 768 total | 1360 × 768 per frame |
Usable panel size | ~450 × 380 px | full frame |
Prop continuity | held | broke |
Set-dressing continuity | held | drifted |
Backgrounds on close-ups | no grey backdrop inherited | close-up inherited the reference backdrop |
Ready as a video reference | no | yes |
Complete job, reference included | ~57.5 s / 2 credits | 3 min 38 s / 7 credits |
Per-frame timings for the separate method were 29.5 s, 36.5 s, 25.5 s, 34.6 s, 40.5 s and 26.4 s — an average of 32.2 seconds each. Which is to say: one frame generated separately costs about as much time as an entire six-panel sheet.
Where the sheet held up better
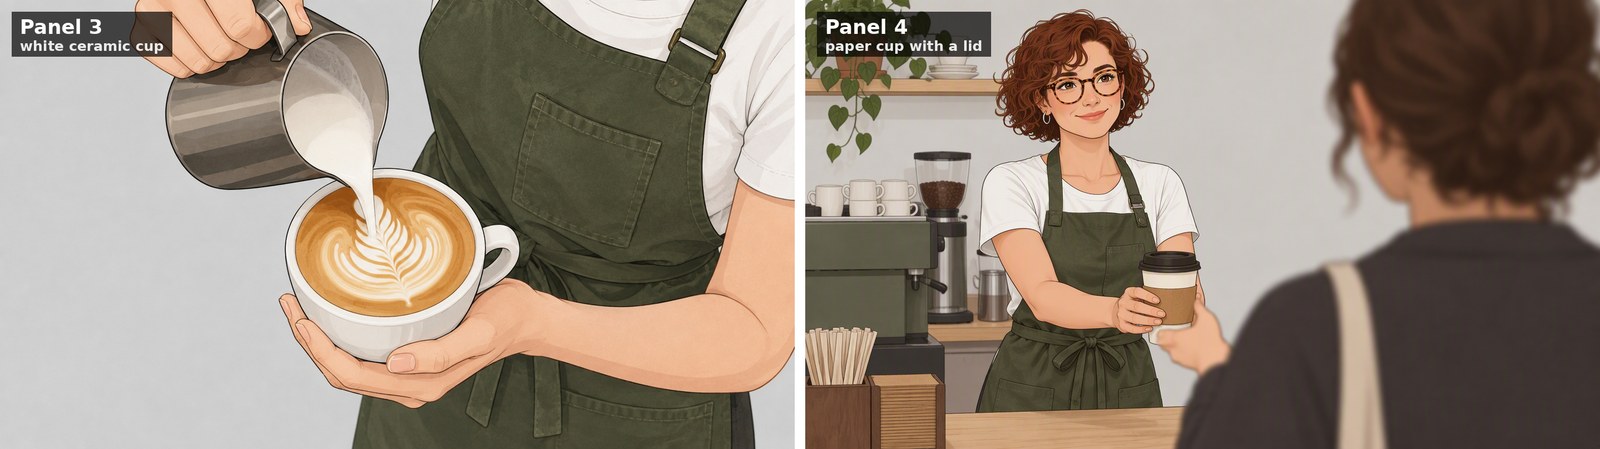
All six panels are generated in the same pass, and in this test that produced better continuity than generating the frames independently. In my frame-by-frame run, panel 3 showed a white ceramic cup with latte art and panel 4 showed a paper takeaway cup with a lid — the same cup, one shot later. On the single sheet, the white ceramic cup in panel 3 was still the white ceramic cup in panel 4.
Recommended workflow
Use both, in this order:
One sheet for planning → approve the sequence → rebuild only the two or three frames you actually need at full resolution.
That gives you the speed and continuity of a contact sheet and the resolution of separate generation, without paying six credits to discover your shot order was wrong.
Open the GPT Image 2.5 generator
9-Panel GPT Image 2.5 Storyboard Prompt
Nine panels work when the story needs more rhythm. I ran this too: 31.5 seconds, 1 credit, a correct 3 × 3 grid numbered 01–09, the character consistent in every panel she appears in, and the white ceramic cup again carried correctly from panel 6 to panel 7. One panel came back wrong, for a reason worth its own section below.
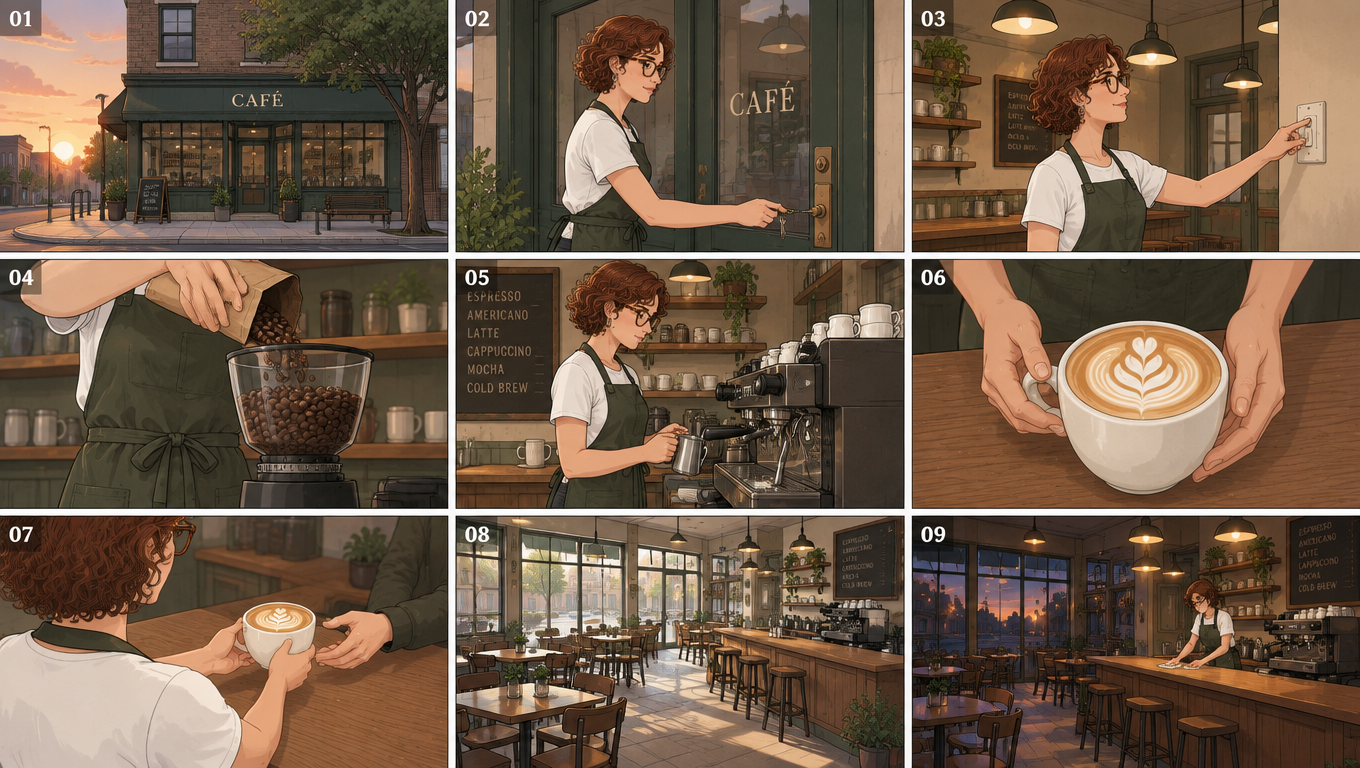
Create a cinematic nine-panel storyboard arranged in a clean 3x3 grid. Use the uploaded image as the permanent character reference.
Continuity lock: keep the same character identity, facial features, hairstyle, outfit, proportions, environment, props, colour palette and lighting continuity across the sequence.
Panel 1: extreme wide establishing shot — [location]. Panel 2: medium shot — [arrival or entry]. Panel 3: medium shot — [first action]. Panel 4: close-up of hands — [preparation detail]. Panel 5: medium shot — [main task]. Panel 6: close-up — [hero detail]. Panel 7: over-the-shoulder — [exchange]. Panel 8: wide shot — [scene at peak]. Panel 9: wide shot — [closing beat].
Use clear panel borders and number the panels 01 to 09. [Style] illustration style, muted palette. Maintain logical camera geography.
Nine panels at 1K leaves each panel roughly 450 × 250 px. That is fine for review and pitching, too small for anything downstream. If you need nine shots at usable resolution, run the sheet first to lock the sequence, then generate the keepers individually at full size. Raising the sheet itself to 2K or 4K is the other obvious route, but I did not test it here.
One Constraint That Quietly Backfires
Here is a failure worth knowing about, because it looks like a model limitation and is actually a prompt bug.
My nine-panel prompt asked for panel 8 to be “a wide shot of the busy café at midday.” It also ended with the standard boilerplate: do not add extra characters. The model returned an immaculate, completely empty café.
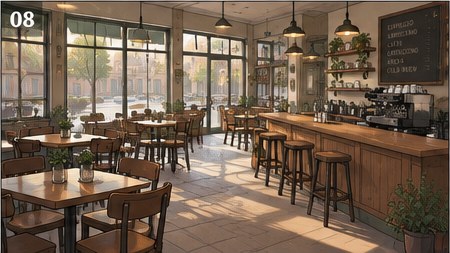
The blanket constraint overrode the explicit request. If your board needs crowds, queues, customers or background extras, scope the constraint instead of stating it absolutely:
Do not add extra characters except where a panel explicitly describes them.
The lesson from this run: broad constraints can override panel-specific instructions.
What Breaks When You Generate Frame by Frame
The separate-frame method gives you full resolution, and it costs you continuity in four specific ways. All four have fixes.
Props do not carry over. This is the ceramic-cup-to-paper-cup break described above. The model preserves the character from your reference; it does not preserve objects from the previous frame. Fix: describe every prop explicitly in every frame, or add a second reference image of the prop.
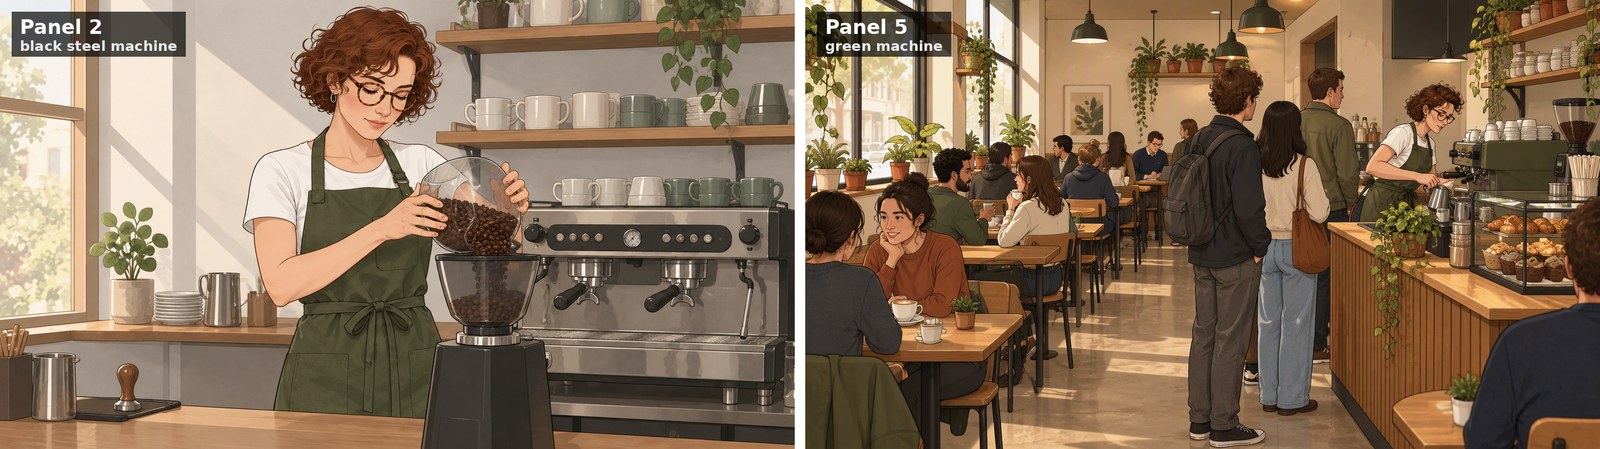
Set dressing drifts. In my run the espresso machine was black and steel in frame 2 and green in frames 4 and 5; the counter front was wood slats in frame 5 and green panelling in frame 6. Fix: generate an establishing shot of the location first and load it as a second reference alongside the character.
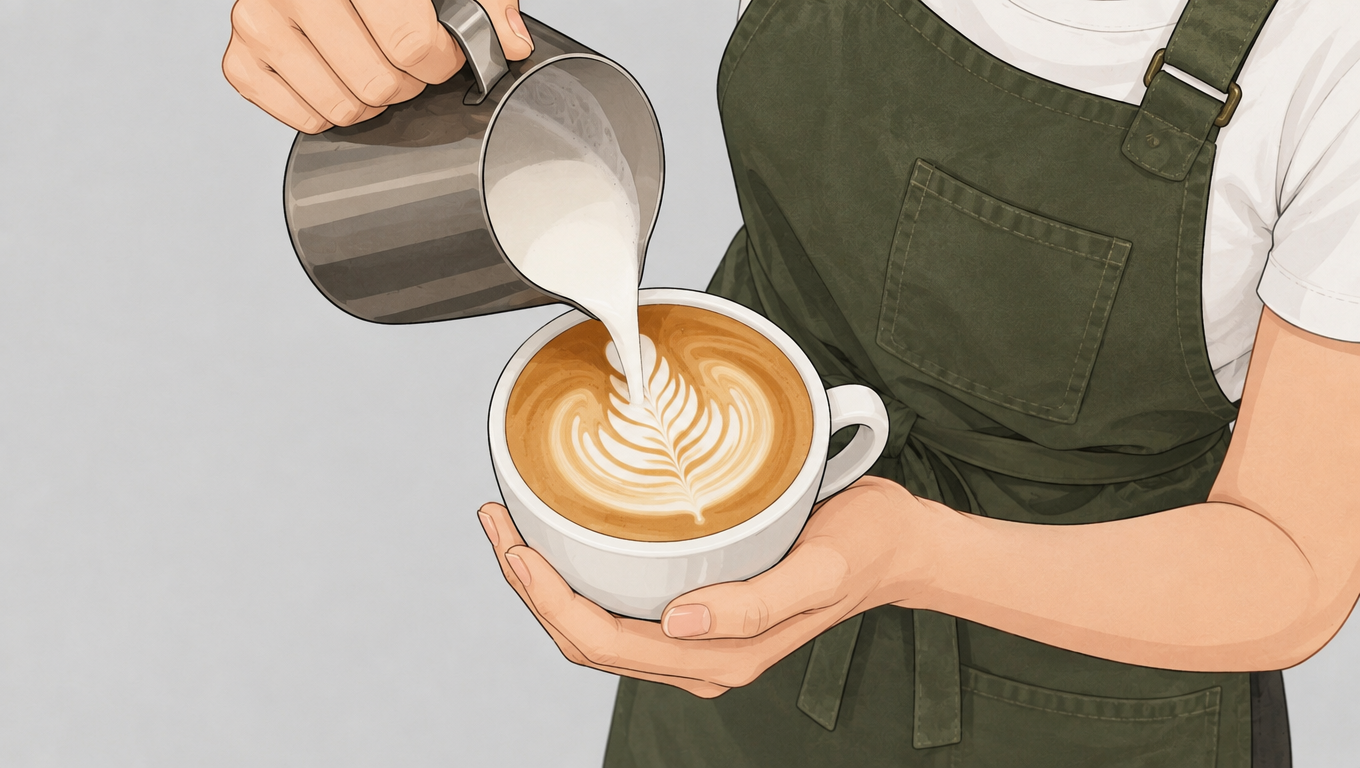
Tight close-ups inherit the reference background. Frame 3 was meant to be inside the café; the background came back as the flat light-grey of the character sheet. When the shot is tight enough that no environment is visible, the model reaches for the reference image’s backdrop. Fix: over-specify the environment on close-ups, or shoot your reference sheet in-environment rather than on a plain field.
Camera position is treated as a suggestion. I asked for a shot “from behind the counter” and got one from in front of it; I asked for “a high angle” and got a straight-on chest-level view. Composition, lighting and subject were right every time — camera placement was the least reliable instruction in the set. Fix: describe what is visible rather than where the camera is. “Her back to us, the espresso machine filling the right of frame” works better than “from behind the counter.”
None of these are fatal for a board whose job is communicating intent. All of them matter if the frames are going into a video model, which will happily animate your continuity error.
How to Change Camera Angles Without Losing the Character
Moving from front portrait to profile to wide shot to high angle forces the model to infer parts of the character the reference never showed. Separate the camera change from the identity:
Identity: keep the exact same woman from the reference. Camera: show her from a left three-quarter angle in a medium shot. Action: she looks down at the cup in her hands. Preserve: face shape, curly auburn hair, glasses, apron, proportions, lighting direction, café environment.
The camera is the variable. The character is not.
Settings That Actually Change the Result
The generator exposes 15 aspect ratios — 1:1, 3:2, 2:3, 3:4, 4:3, 4:5, 5:4, 9:16, 16:9, 21:9, 2:1, 1:2, 3:1, 1:3 and 9:21. Use 16:9 for standard boards, 21:9 for anamorphic, 9:16 for vertical social.
Edit mode adds an Auto-detect option that inherits the ratio from your reference image. Set the ratio explicitly instead — your character sheet’s shape is rarely your film’s shape.
Resolution runs 1K, 2K and 4K; quality runs Low, Medium, High, Extra high and Max, with credit cost scaling accordingly. My entire test ran at 1K and Medium. For multi-panel sheets, 2K is worth testing when you need larger individual panels, although I did not benchmark 2K in this workflow.
GPT Image 2.5 Storyboard Prompt for a Product Ad
The two templates that follow use the same structure as the six-panel board tested above — reference, continuity lock, one job per numbered panel. I did not run these two scenarios separately, so treat them as adaptations of a tested structure rather than as tested results in their own right.
Create a six-panel premium commercial storyboard in a 3x2 grid for a minimalist skincare serum. Keep the same bottle shape, label design, cap, proportions, logo placement and liquid colour consistent across every panel.
Panel 1: wide hero shot of the bottle on wet white stone, soft morning light. Panel 2: macro close-up of water droplets on the glass. Panel 3: a hand enters frame and lifts the bottle. Panel 4: close-up of one drop falling from the applicator. Panel 5: lifestyle bathroom scene with the same bottle beside a mirror. Panel 6: final clean packshot with negative space for advertising copy.
Number the panels 01 to 06. Premium beauty-commercial lighting, realistic reflections, restrained palette. Do not redesign the packaging or invent different label text between panels.
For products, load a reference photo of the actual bottle rather than generating one. My test only covered a person, so I cannot say how tightly a label or logo holds across panels — that is the first thing to check on your own product before trusting a board.
GPT Image 2.5 Storyboard Prompt for a Vertical Short
Create a six-shot vertical 9:16 storyboard sheet for a 15-second cinematic social video. Same character across all shots: short dark hair, beige trench coat, red umbrella.
Shot 1: wide frame, walking through a rainy crosswalk. Shot 2: low-angle medium shot of shoes stepping through a puddle. Shot 3: close-up as she looks upward. Shot 4: insert shot of raindrops hitting the red umbrella. Shot 5: side-profile tracking composition past neon storefronts. Shot 6: front-facing medium close-up as she stops and smiles.
Number the panels 01 to 06. Keep the character, umbrella, wardrobe, rainy nighttime environment and neon palette continuous. Compose every panel for vertical video with clear subject separation.
Set the sheet itself to 16:9 and compose vertical panels inside it, or set 9:16 and stack fewer panels. A 9:16 sheet of six panels leaves each one very small.
From Storyboard to Video with Seedance 2.5
A storyboard that stays a storyboard is a deliverable. A storyboard that becomes footage is a pipeline.
I took frame 1 of the full-resolution board — the barista unlocking the door at dawn — into Seedance 2.5 in Reference Generation mode at 480p, 16:9, 8 seconds. The duration slider runs from 4 to 30 seconds.
It cost 16 credits and took about six minutes, returning an 854 × 480 clip of 8.06 seconds.

The frame held. The opening composition is recognisably the storyboard panel — same street, same half-closed shutters next door, same low sun. The slow push-in executed as prompted. The character’s face, hair, glasses and apron survived the transfer from image model to video model, which is the step I was least confident would hold. By 7.6 seconds she has gone inside and the shot rests on the empty storefront, which is a clean handoff into the next shot — though if you want the character on screen at the out-point, say so explicitly.
The practical lesson: in this test, the storyboard frame gave the video model much stronger visual direction than text alone. Composition, lighting, wardrobe and character design arrived already resolved, without my having to describe any of them in the video prompt. I did not run a text-only control generation, so this is one observation rather than a benchmark. The economics hold either way — those decisions cost 1 credit to iterate on as a still, and 16 credits to correct inside a video generation.
This is also why the sheet-first workflow pays off twice. The panel you animate should be a full-resolution frame, not a 450-pixel tile — but you should only pay for that full-resolution frame after the sheet has told you which shot is worth animating.
Turn your frames into footage with Seedance 2.5
Both models live on the same account, so the board and the clip come out of one credit balance — see the full GPT Image model line-up if you want to compare what each version holds on to before you commit a board to one of them.
How to Fix an Inconsistent Storyboard
The face changes between panels. The identity description is too weak or the angle changed too aggressively. Use an approved reference image and repeat the strongest identity anchors in every panel.
The outfit changes. Clothing was treated as description instead of a locked property. Move wardrobe into the continuity block.
The shots look too similar. The prompt covers actions but not visual grammar. Explicitly vary extreme wide, wide, medium, over-the-shoulder, close-up, insert, low angle and high angle.
One panel is wrong but the rest are good. On a sheet, regenerate the sheet — it is one credit. On separate frames, regenerate only that frame rather than the whole set; OpenAI positions the focused-editing improvements in Images 2.5 for this kind of targeted fix, though I did not test single-panel repair here.
Too much happens in one panel. “She enters, notices the case, opens it, gets scared and runs” is five shots. Splitting it is the entire point of storyboarding.
A Simple GPT Image 2.5 Storyboard Formula
FORMAT — panel count + grid layout + aspect ratio + numbering REFERENCE — which image defines the character or product CONTINUITY LOCK — identity + wardrobe + environment + props + lighting SHOTS 1–N — framing + action, one beat each VISUAL STYLE — cinematic / commercial / anime / documentary / editorial CONSTRAINTS — scoped, not absolute
The formula works because it separates what stays consistent from what changes shot by shot.
GPT Image 2.5 Storyboard Checklist
Is the same character recognisable in every panel?
Is wardrobe consistent?
Are important props unchanged between consecutive panels?
Does the environment stay spatially believable?
Is lighting direction consistent with time of day?
Does every shot add new story information?
Are camera sizes varied?
Are the panel numbers present and in order?
Did any blanket constraint suppress something a panel asked for?
Can each important panel survive being regenerated at full resolution?
A beautiful inconsistent storyboard is still a poor production plan.
Flare or Sunburst for Storyboards?
OpenAI ships two 2.5 variants: Flare, the faster one, and Sunburst, positioned for tighter control across edits.
Every test in this guide ran on Flare, because boarding is a volume exercise and you want to iterate cheaply before committing. At 1K and Medium, a full sheet in roughly 32 seconds for 1 credit is cheap enough to regenerate freely — which matters more than per-panel polish at the planning stage.
Consider Sunburst for the two or three frames that become production references, especially when editing precision matters more than iteration speed — that is a call based on how OpenAI positions the two variants, not on a test I ran here. Both are selectable on the GPT Image 2.5 page, so the cheapest way to settle it is to run your own hero frame through each.
What This Whole Test Cost
Stage | Settings | Time | Credits |
|---|---|---|---|
Character reference | Flare, text-to-image, 16:9, 1K, Medium | ~25 s | 1 |
Six frames, separately | Flare, edit mode, 16:9, 1K, Medium | 3 min 13 s | 6 |
Six-panel sheet | Flare, edit mode, 16:9, 1K, Medium | 32.5 s | 1 |
Nine-panel sheet | Flare, edit mode, 16:9, 1K, Medium | 31.5 s | 1 |
One animated shot | Seedance 2.5, 480p, 16:9, 8 s | ~6 min | 16 |
The comparison worth drawing is not against a professional storyboard artist, who brings judgement this workflow cannot. It is against the version of the scene that never gets boarded at all because boarding it was not worth two days.
FAQ
Common questions about building a GPT Image 2.5 storyboard, answered from the test run above. Where a question goes beyond what I measured, the answer says so.
Can GPT Image 2.5 create storyboards?
Yes. In testing it produced both a six-panel 3 × 2 sheet and a nine-panel 3 × 3 sheet with correct panel borders and correctly ordered 01-onward numbering, each in about half a minute for 1 credit, from a single character reference image.
What is the best GPT Image 2.5 storyboard prompt?
One that defines the reference character first, adds a continuity lock covering identity, wardrobe, environment and props, then assigns exactly one action and one camera framing to each numbered panel. Avoid describing all panels as one long paragraph.
How many reference images can I use for a GPT Image 2.5 storyboard?
Up to 16, in JPG, PNG or WebP at 10 MB each. One character reference is enough for a single-character board; add a second for the location and a third for a hero prop if continuity matters.
Does the reference image need reloading for each frame?
No. In this test the reference stayed loaded across all six generations — the counter still showed 1 / 16 after the last frame.
Should I generate the whole storyboard at once or frame by frame?
Start with one sheet. Working from the same character reference, a six-panel sheet took 32.5 seconds and 1 credit and held prop and set continuity, while the same six shots generated separately took 3 minutes 13 seconds and 6 credits and broke continuity between panels — but produced full-resolution images. Plan on a sheet, then rebuild only the frames you need at full size.
How many panels should a GPT Image 2.5 storyboard have?
Four to six for a simple ad or short sequence; nine when the story needs more rhythm. Remember that at 1K, a six-panel sheet gives roughly 450 × 380 px per panel and a nine-panel sheet roughly 450 × 250 px, so panel count trades directly against usable resolution.
How do I keep the same character across storyboard panels?
Use an approved character reference sheet, name the specific permanent traits, keep wardrobe in the continuity block, and do not redesign the character inside individual panel prompts. In the frame-by-frame run, identity held across all six frames, including a wide shot where the character was a small figure in a crowded room.
How long does a GPT Image 2.5 storyboard take?
A six-panel sheet took 32.5 seconds and a nine-panel sheet 31.5 seconds at 16:9, 1K and Medium quality. Generated separately, individual frames averaged 32.2 seconds each. Times vary with resolution, quality setting and queue load.
Can I use GPT Image 2.5 storyboards for AI video?
Yes. A full-resolution storyboard frame was uploaded to Seedance 2.5 in Reference Generation mode and animated as an 8-second 854 × 480 clip for 16 credits in about six minutes, with the character design and composition carrying across from the still.
What does GPT Image 2.5 get wrong in storyboards?
Generated frame by frame, props and set dressing do not carry between panels, tight close-ups can inherit the reference image’s background, and camera-position instructions are followed less reliably than composition or lighting instructions. On sheets, blanket constraints such as “do not add extra characters” can override an individual panel that explicitly asked for a crowd.
Final Thoughts
A GPT Image 2.5 storyboard works best when you stop treating it as one complicated image prompt and start treating it as a small production plan: establish the character, lock what must not change, break the story into beats, and give every panel one camera job. Generate the sheet first — it is a single credit and half a minute — then rebuild only the frames that are going somewhere. Every decision you settle as a still is a decision you are not paying sixteen credits to fix inside a video generation.
Start with one character reference, one continuity lock, and six clearly numbered shots in the GPT Image 2.5 generator — then bring the frame you like best into Seedance 2.5 and watch it move. More hands-on write-ups like this one are in the GPT Image blog.